<?xml version="1.0" encoding="utf-8"?><feed xmlns="http://www.w3.org/2005/Atom" ><generator uri="https://jekyllrb.com/" version="3.10.0">Jekyll</generator><link href="https://aravinda89.github.io/feed.xml" rel="self" type="application/atom+xml" /><link href="https://aravinda89.github.io/" rel="alternate" type="text/html" /><updated>2026-09-06T18:18:10+00:00</updated><id>https://aravinda89.github.io/feed.xml</id><title type="html">UNDERFITTED</title><subtitle>Learning AI by building, breaking, and pretending it was intentional.</subtitle><entry><title type="html">How to Run a Free AI Coding Assistant Locally with VS Code, opencode, and LM Studio</title><link href="https://aravinda89.github.io/local-ai-coding-assistant-vscode-opencode-lmstudio/" rel="alternate" type="text/html" title="How to Run a Free AI Coding Assistant Locally with VS Code, opencode, and LM Studio" /><published>2026-09-05T00:00:00+00:00</published><updated>2026-09-05T00:00:00+00:00</updated><id>https://aravinda89.github.io/local-ai-coding-assistant-vscode-opencode-lmstudio</id><content type="html" xml:base="https://aravinda89.github.io/local-ai-coding-assistant-vscode-opencode-lmstudio/"><![CDATA[<p>Every AI coding assistant wants your credit card. And your code.</p>

<p>There’s a third option, and it costs nothing: run the whole thing on your own computer. No subscription. No internet. Your code never leaves your machine.</p>

<p>I set this up on a fairly ordinary PC, and it works. Here’s exactly how.</p>

<h2 id="what-youre-building">What you’re building</h2>

<p>Three pieces working together:</p>

<ul>
  <li><strong>LM Studio</strong> — runs the AI model on your PC. This is the engine.</li>
  <li><strong>opencode</strong> — the coding assistant that reads and edits your files.</li>
  <li><strong>VS Code</strong> — where you actually write code.</li>
</ul>

<p>LM Studio does the thinking. opencode does the work. VS Code is where you sit.</p>

<p><strong>My setup:</strong> Windows, RTX 3070 Ti with 8GB VRAM, 16GB RAM. That’s a mid-range gaming PC, not a workstation. If yours is similar, you’re fine.</p>

<h2 id="step-1-install-lm-studio">Step 1: Install LM Studio</h2>

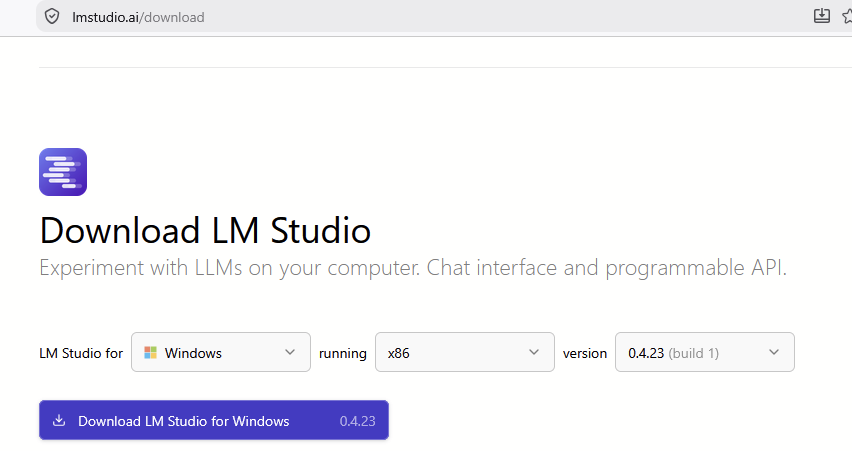
<p>Download it from <a href="https://lmstudio.ai/download/">lmstudio.ai</a> and install it like any normal app.</p>

<p>LM Studio lets you download and run open-source AI models directly on your computer. It’s the easiest way into local AI — no command line required.</p>

<p><img src="/images/lmstudio-home.png" alt="LM Studio app home screen" /></p>

<h2 id="step-2-download-the-model">Step 2: Download the model</h2>

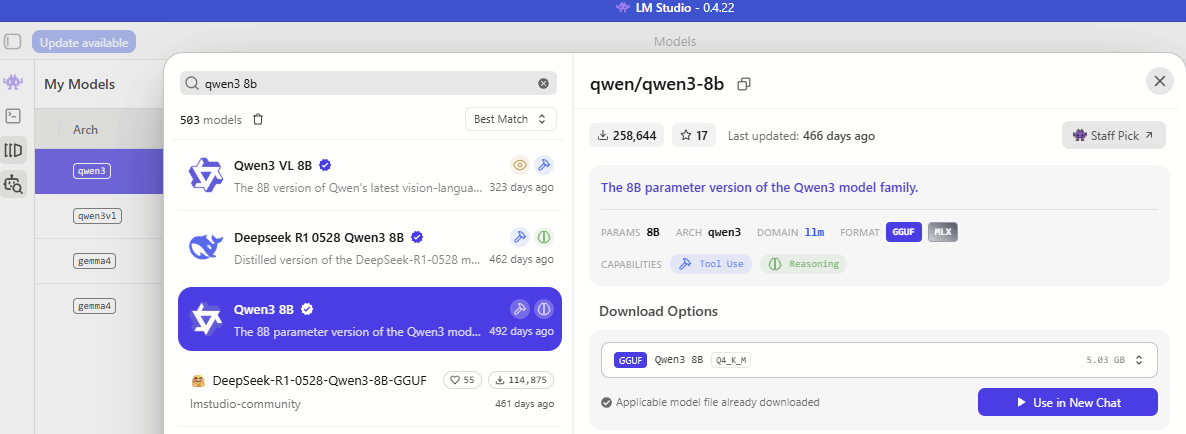
<p>Open the search inside LM Studio and look for <strong>qwen3 8b</strong>.</p>

<p>You’ll see a lot of versions. Check these three things before you download:</p>

<ul>
  <li><strong>Format:</strong> GGUF</li>
  <li><strong>Quantization:</strong> Q4_K_M</li>
  <li><strong>Capabilities:</strong> “tool use” must be listed</li>
</ul>

<p>Why those matter, in plain English:</p>

<p><strong>Quantization is compression.</strong> Q4_K_M shrinks the model so it fits on a smaller graphics card. You lose a little quality, but you gain the ability to actually run it.</p>

<p><strong>Tool use is non-negotiable.</strong> A coding assistant needs to open your files and edit them. A model without tool use can only chat about your code — it can’t touch it. Skip this check and nothing will work later.</p>

<p><img src="/images/lmstudio-model-search.png" alt="Searching for the Qwen3 8B model in LM Studio" /></p>

<p>Got different hardware? Pick a model that fits it. Bigger models are smarter but hungrier. An 8B model is a comfortable fit for 8GB of VRAM.</p>

<p>Once the download finishes, your model shows up under <strong>My Models</strong>.</p>

<p><img src="/images/lmstudio-my-models.png" alt="Downloaded models list in LM Studio" /></p>

<h2 id="step-3-load-the-model">Step 3: Load the model</h2>

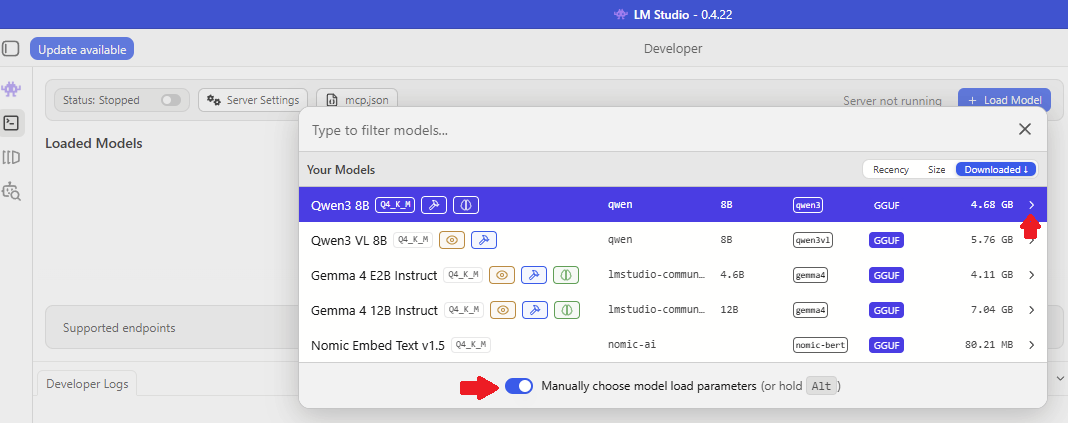
<p>Go to the <strong>Developer</strong> tab and select your model.</p>

<p>Turn on <strong>“Manually choose model load parameters”</strong>, then click the small arrow next to the model name to open the settings.</p>

<p><img src="/images/lmstudio-developer-tab.png" alt="LM Studio developer tab with model load settings" /></p>

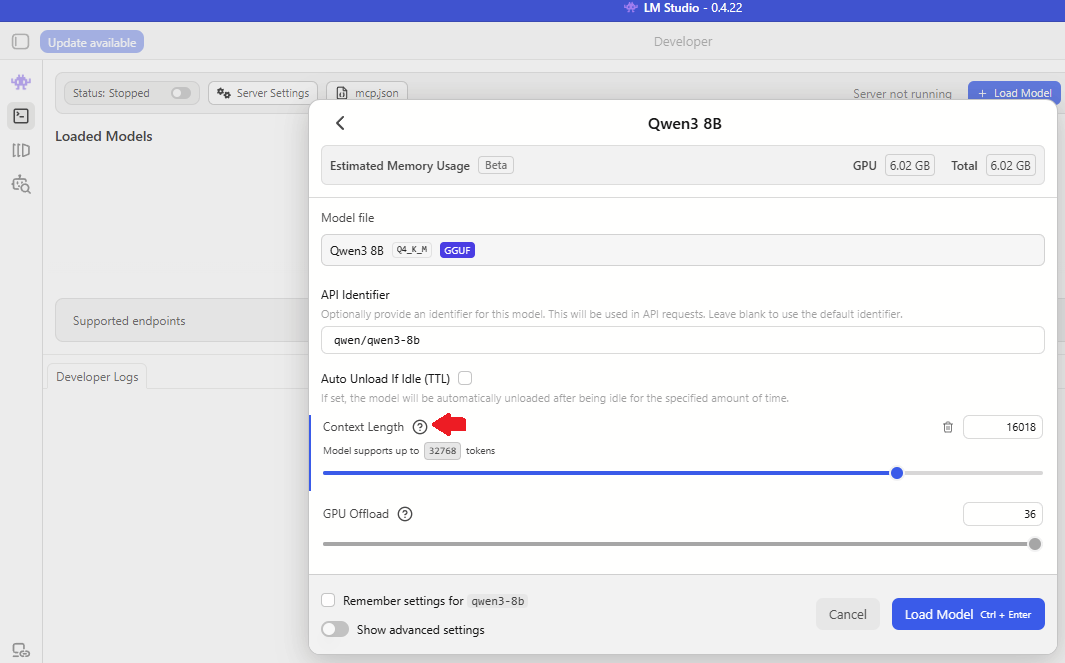
<p>Now find <strong>context size</strong> and set it to <strong>16000</strong>.</p>

<p>Context size is how much text the model can hold in its head at once — your question plus its answer plus whatever code it’s looking at. Bigger context means it understands more of your project. It also eats more VRAM.</p>

<p>16000 is a good number for 8GB. If you have less, go lower. If the model refuses to load, lower it again and try once more.</p>

<p><img src="/images/lmstudio-context-size.png" alt="Setting context size to 16000 in LM Studio" /></p>

<h2 id="step-4-turn-on-the-server">Step 4: Turn on the server</h2>

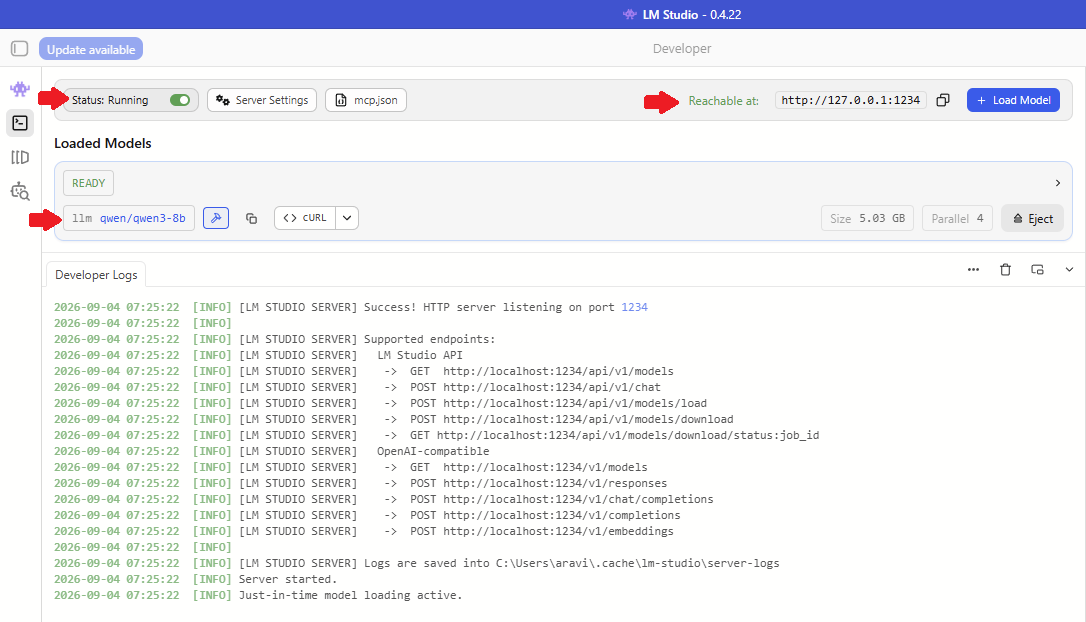
<p>Flip the server status to <strong>Running</strong>.</p>

<p><img src="/images/lmstudio-server-running.png" alt="LM Studio local server running" /></p>

<p>Your model is now live at <code class="language-plaintext highlighter-rouge">http://127.0.0.1:1234</code>.</p>

<p>That address is your own machine talking to itself. Nothing is going out to the internet — which is the entire point.</p>

<h2 id="step-5-install-vs-code-and-opencode">Step 5: Install VS Code and opencode</h2>

<p>Install VS Code if you don’t have it.</p>

<p>Then install opencode. On Windows in command prompt, the simplest route is npm:</p>

<div class="language-bash highlighter-rouge"><div class="highlight"><pre class="highlight"><code>npm <span class="nb">install</span> <span class="nt">-g</span> opencode-ai
</code></pre></div></div>

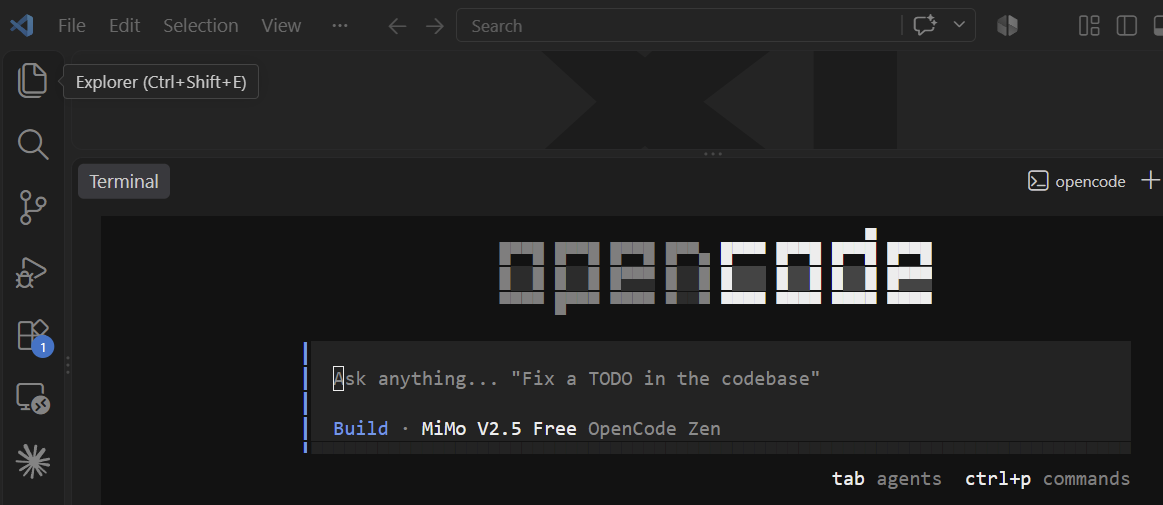
<p>Open a terminal inside VS Code (<strong>Terminal → New Terminal</strong>) and type:</p>

<div class="language-bash highlighter-rouge"><div class="highlight"><pre class="highlight"><code>opencode
</code></pre></div></div>

<p>opencode starts up right there in the terminal panel.</p>

<p><img src="/images/opencode-terminal.png" alt="opencode running in the VS Code terminal" /></p>

<h2 id="step-6-point-opencode-at-your-local-model">Step 6: Point opencode at your local model</h2>

<p>Here’s the part that trips people up. opencode has no idea your model exists yet. You have to tell it, using a config file.</p>

<p>Create the config file — <a href="https://gist.github.com/Aravinda89/4e62deab8078d6879282a7b930bf3360">here’s mine</a></p>

<script src="https://gist.github.com/Aravinda89/4e62deab8078d6879282a7b930bf3360.js"> </script>

<p>save it to:</p>
<div class="language-plaintext highlighter-rouge"><div class="highlight"><pre class="highlight"><code>C:\Users\YOUR_USERNAME\.config\opencode
</code></pre></div></div>

<p>Swap <code class="language-plaintext highlighter-rouge">YOUR_USERNAME</code> for your actual Windows username. If that folder doesn’t exist, create it.</p>

<h2 id="step-7-pick-your-model-and-test-it">Step 7: Pick your model and test it</h2>

<p>Restart VS Code, then start opencode again.</p>

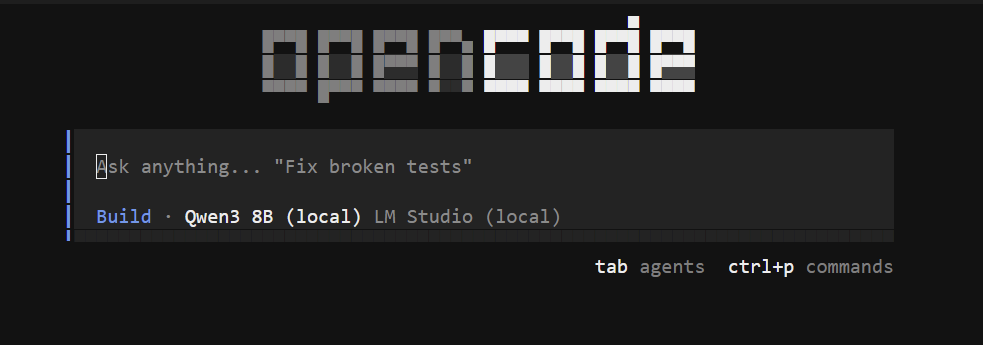
<p>Type <code class="language-plaintext highlighter-rouge">/models</code> and select <strong>qwen/qwen3-8b</strong> from the list.</p>

<p><img src="/images/opencode-model-list.png" alt="Selecting the local model in opencode" /></p>

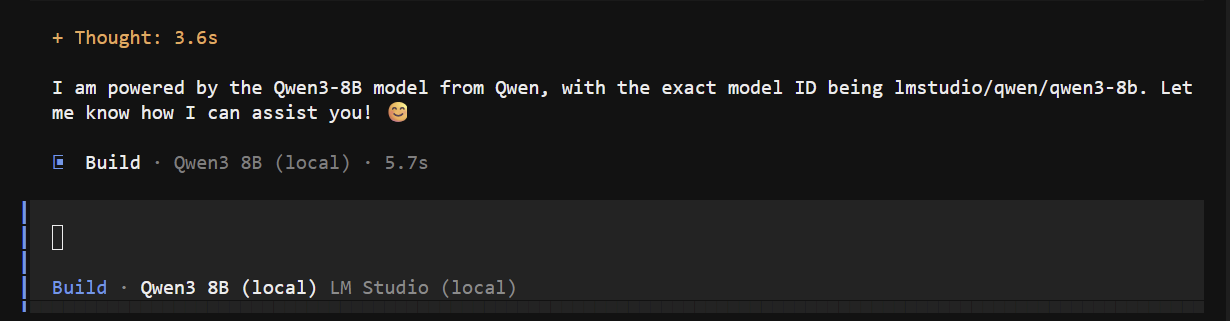
<p>Now ask it to do something real. Give it a file to fix.</p>

<p><img src="/images/opencode-answer.png" alt="opencode answering a coding question" /></p>

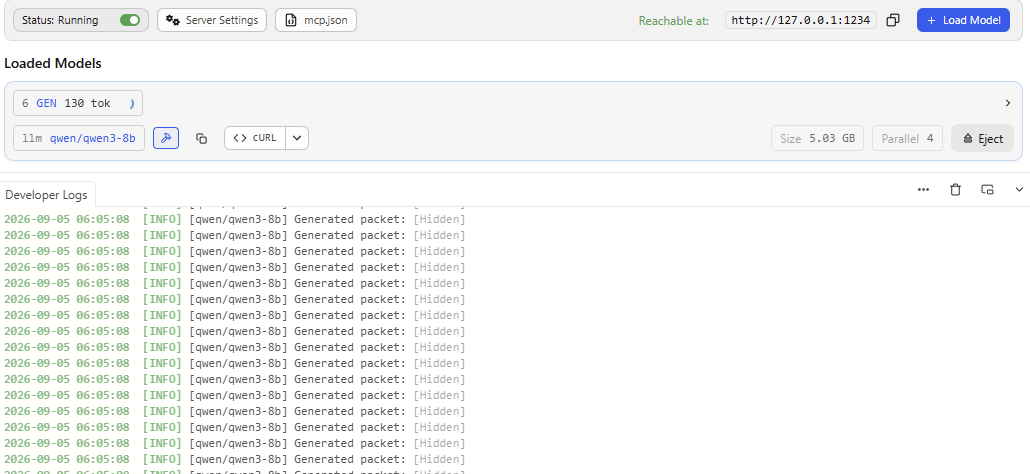
<p>Want proof it’s actually running locally? Switch over to LM Studio and check the logs. You’ll see tokens streaming as the assistant types.</p>

<p><img src="/images/lmstudio-logs.png" alt="LM Studio logs showing token generation" /></p>

<p>That’s your own GPU doing the work.</p>

<h2 id="what-to-expect">What to expect</h2>

<p>Let’s be straight about this: a local 8B model is not going to match Claude or GPT on a hard architectural problem. It’s smaller, and smaller means less capable.</p>

<p>But for the everyday stuff — writing boilerplate, explaining unfamiliar code, catching bugs, renaming things across files — it holds its own. And it’s fast, because there’s no network round trip.</p>

<p>The best part is what it costs: nothing, forever. No token limits. No monthly bill. Works on a plane.</p>

<p>If you have more VRAM than I do, try a larger model. Same steps, better results.</p>]]></content><author><name></name></author><category term="tutorials" /><category term="local-llm" /><category term="ai-coding-assistant" /><category term="lmstudio" /><category term="opencode" /><category term="vscode" /><category term="qwen3" /><category term="offline-ai" /><summary type="html"><![CDATA[Set up a free AI coding assistant that runs entirely on your own PC. Step-by-step guide using VS Code, opencode, and LM Studio with a local Qwen3 8B model.]]></summary></entry><entry><title type="html">How to split image dataset into train, validation and test set?</title><link href="https://aravinda89.github.io/splitdata/" rel="alternate" type="text/html" title="How to split image dataset into train, validation and test set?" /><published>2023-04-22T00:00:00+00:00</published><updated>2023-04-22T00:00:00+00:00</updated><id>https://aravinda89.github.io/splitdata</id><content type="html" xml:base="https://aravinda89.github.io/splitdata/"><![CDATA[<p>Splitting image data into train, validation, and test sets is a crucial step in machine learning model development. It helps to prevent over-fitting, evaluate model performance, and ensure that the model generalizes well to new, unseen data.
It’s useful to have code that can quickly separate image data into training, validation, and testing datasets.
The folder structure would look something like this:</p>

<script src="https://gist.github.com/Aravinda89/ae9ba29924cec60f892fc290647d8759.js"></script>

<ol>
  <li>Obtain the image data Retrieve all the images located in the designated folder.</li>
</ol>

<script src="https://gist.github.com/Aravinda89/b3db76d48c4dfa8d801ae8619b008d3f.js"></script>

<ol>
  <li>Split the data Randomly separate the image data into three sets: 70% for training, 15% for validation, and 15% for testing.</li>
</ol>

<script src="https://gist.github.com/Aravinda89/2241d6cd7fc837b5e172e14cc9c8d997.js"></script>

<ol>
  <li>Copy the images into their respective folders Create separate folders for each set, including the training, evaluation, and testing sets. Copy the images into their respective folders based on the random split.</li>
</ol>

<script src="https://gist.github.com/Aravinda89/11626d83af915b45ea56924b8f09001d.js"></script>

<p><a href="https://github.com/Aravinda89/split_train_eval_test"> Full code </a></p>

<script src="https://gist.github.com/Aravinda89/0aafd15ff5cad8f13e9002f5ec459e8e.js"></script>

<p>“ Why did the machine learning model go to therapy?
Because it couldn’t decide between the train, validation, and test sets — it just kept overthinking! :) ”</p>]]></content><author><name></name></author><summary type="html"><![CDATA[Splitting image data into train, validation, and test sets is a crucial step in machine learning model development. It helps to prevent over-fitting, evaluate model performance, and ensure that the model generalizes well to new, unseen data. It’s useful to have code that can quickly separate image data into training, validation, and testing datasets. The folder structure would look something like this:]]></summary></entry></feed>